How to set up and install a custom HTTPS/SSL certificate for your custom domain
We supply an HTTPS certificate for all websites that are subdomains of
pythonanywhere.com -- so your website at yourusername.pythonanywhere.com
handles HTTPS by default. But if you create a website with a custom domain, you
need to get a certificate. This is because only the owner of a domain can create
a certificate for it, to stop people from (say) creating certs for
www.google.com.
If you're just getting started, we strongly recommend you use Let's Encrypt -- they're the easiest way to get a certificate for your domain, and we can handle all of the setup and renewal for you, so it's just a couple of clicks and you're all set.
However, it you have specific reasons to use a custom certificate, this page explains how to set it up.
In brief, if you already understand how certificates work
You need two files:
- The Private Key, which should be unencrypted, ie it should start with
----BEGIN PRIVATE KEY(orBEGIN RSA PRIVATE KEY) - The Combined Certificate, which consists of your certificate and the certificate chain sent to you by your vendor. It should have several BEGIN/END CERTICATE blocks.
Once you have those sorted, go down to the "Installing the certificate" section further down this page.
Detailed instructions, for people who are new to all this
We (PythonAnywhere) don't sell certificates ourselves, so the first thing is to identify someone who will provide you with a certificate -- an SSL certificate vendor. You may find that your domain name registrar provides them (GoDaddy and Namecheap certainly do), so if you've found their customer service to be good, you might want to use them.
To get the certificate, you'll need to send them a text file called a "Certificate Signing Request" (CSR), which is basically an encoded representation of a request to a certificate-issuing organisation (a "Certification Authority", or CA -- your certificate vendor may be a CA themselves, or they may resell certificates from a CA) saying "please give me a SSL certificate for the following domain, signed by yourselves, that can only be unlocked using my private key." And in order to generate one of those, you'll need to generate a private cryptographic key.
Here are detailed instructions on how to do that on PythonAnywhere.
- From a Bash console on PythonAnywhere, generate the private key and CSR using the openssl command, like this (all on one line, replacing yourdomain.com appropriately):
openssl req -new -newkey rsa:2048 -nodes -keyout yourdomain.com.key -out yourdomain.com.csr
- When the command asks you questions, you need to answer like this:
- Common name: your site's hostname, eg. www.yourdomain.com The www. is important; a certificate for yourdomain.com won't work on www.yourdomain.com, and vice versa, so make sure you enter the one you use for your website.
- Organisation: your business or other organisation name.
- Organisation unit: your department -- just your organisation name again if you prefer.
- City or locality: your city
- State or province: as you'd expect. Leave blank if not applicable
- Country: your two-letter ISO country code as per this Wikipedia page
- When it asks you for a passphrase, leave it blank.
- Next, you need to provide the contents of the CSR (yourdomain.com.csr -- not the key!) to your certificate vendor. They will generate the certificate for you, or will get the CA to do so on their behalf, and send it back to you.
- The certificate (which you should save on PythonAnywhere as yourdomain.com.cert) will be a text file starting with something like
BEGIN CERTIFICATE(with some dashes on either side), then some encoded stuff, thenEND CERTIFICATE(again, with dashes). It's an encoded proof that the CA have certified that the person who owns the private key (the yourdomain.com.key file, which they haven't seen, but which was used to sign the CSR they did receive) definitely is you. - Because not all browsers necessarily trust your particular CA to certify people, you also often need a "certificate chain" AKA a "certificate bundle", which connects your certificate with someone who is trusted by all browsers. This is yet another text file, with several certificates in it. The certificate vendor should send it to you alongside your own certificate. You can tell the difference between the two because your certificate will just have one "BEGIN/END" bit in it, while the chain will probably have several. (Some CAs are able to offer certificates that are trusted directly. They tend to be the most expensive ones. Check with your certificate vendor if you're unsure.)
- Once you have the certificate and the chain, create a new file which has your certificate at the top, then the chain afterwards. (You may have to add a newline so that you don't get the END line of your certificate on the same line as the BEGIN for the first line of the chain.) Save that as yourdomain.com.combined.cert
- Get your private key: This is the private key that you would have created as part of the process of generating the CSR. You will need to give it to us unencrypted, so make sure that the key starts with the line
-----BEGIN PRIVATE KEY-----. if you see something likeProc-Type: 4,ENCRYPTEDthen it's encrypted and you need to decrypt it before we can use it:openssl rsa -in server.key.encrypted -out server.key
Installing the certificate
Once you've got the certificate and the key, and prepared your combined certificate file, you need to install it -- that is, let the PythonAnywhere web-serving system know that it should use your certificate and key for your site. You can do that from a bash console, or using the web interface.
Installing a certificate from the web interface:
-
Go to the "Web" page:

...and click the pencil icon next to the "None" on the "HTTPS certificate" line to edit your certificate.
-
Select the "Custom certificate" option:

-
Copy/paste your private key and your certificate chain into the text boxes:

-
Click the save button; after a few moments, you should see that the certificate has been installed:

Once that's done, you're all set! Just go to the HTTPS URL for your site, like https://www.yourdomain.com, and you'll see that the site is now marked as secure. You will need to renew your certificate from time to time -- the expiry date for the certificate is shown on the page.
If you want to make your site even more secure, you can set it up so that when people visit the non-secure URL they are automatically redirected to the secure version. This is called "forcing HTTPS", and is described on this help page.
Installing a certificate from the command line
-
Make sure that the combined certificate and private key files are stored inside your file storage on PythonAnywhere.
-
Enable the PythonAnywhere API: the first step to do that is to make sure you have an API token set up for your account; go to the "Account" page and then click the "API token" tab. If you see this:
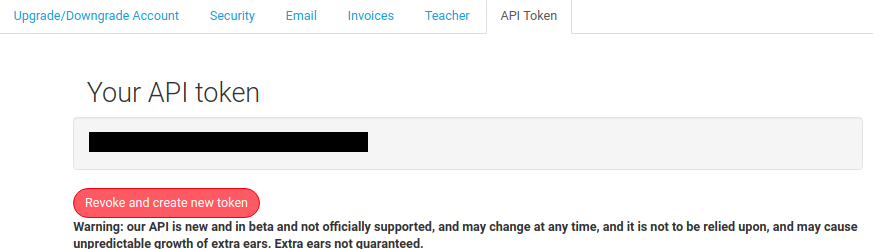
...then you're all set. If, however, you see this:
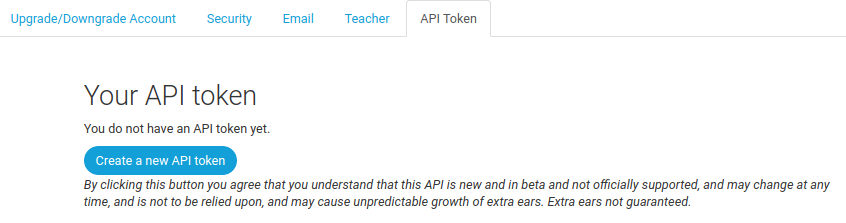
...then you need to click the button to generate a token.
-
Install the PythonAnywhere helper scripts. Start a new Bash console (old ones won't have API access) and run this command to install the PythonAnywhere helper scripts:
pip3.7 install --user --upgrade pythonanywhere
-
Install the certificate: just run the following PythonAnywhere helper script (replacing www.yourdomain.com with your actual domain name and adjusting the paths to point to the combined certificate and private key):
pa_install_webapp_ssl.py www.yourdomain.com /home/yourusername/something/combined-cert.pem /home/yourusername/something/private-key.pem
It should print out something like this:
< Setting up SSL for www.yourdomain.com via API >
   \
    ~<:>>>>>>>>>
< Reloading www.yourdomain.com via API >
   \
    ~<:>>>>>>>>>
  _________________________________________________________________
/                                                                   \
| That's all set up now :-) Your new certificate will expire         |
| on 12 November 2018, so shortly before then you should             |
| renew it and install the new certificate.                          |
\                                                                   /
  -----------------------------------------------------------------
   \
    ~<:>>>>>>>>>
If you get any errors, just email us at support@pythonanywhere.com.
You're all set! Just go to the HTTPS URL for your site, like https://www.yourdomain.com, and you'll see that the site is now marked as secure.
However, when your certificate expires (you can see that the script told you when that will happen) you'll need to renew it and then install the new certificate with the same command.
If you want to make your site even more secure, you can set it up so that when people visit the non-secure URL they are automatically redirected to the secure version. This is called "forcing HTTPS", and is described on this help page.
TLS version support
By default, our servers only support recent, secure versions of TLS, the protocol that HTTPS uses for secure connections. Some older devices (eg. Windows 7, Android devices from before 2014) only support the older, non-secure versions. There's more information (including how to get your website to support those old versions) on our TLS version support page.